How to Create AI Lip Sync Videos in 2026: A Practical Workflow That Holds Up
A convincing AI lip sync video usually breaks in one of three places: the source footage, the translated script, or the final timing pass. As of May 20, 2026, YouTube is expanding automatic dubbing and multi-language audio, but the production lesson has not changed. If you want a result that looks believable, lip sync is the finishing layer, not the first button you press.
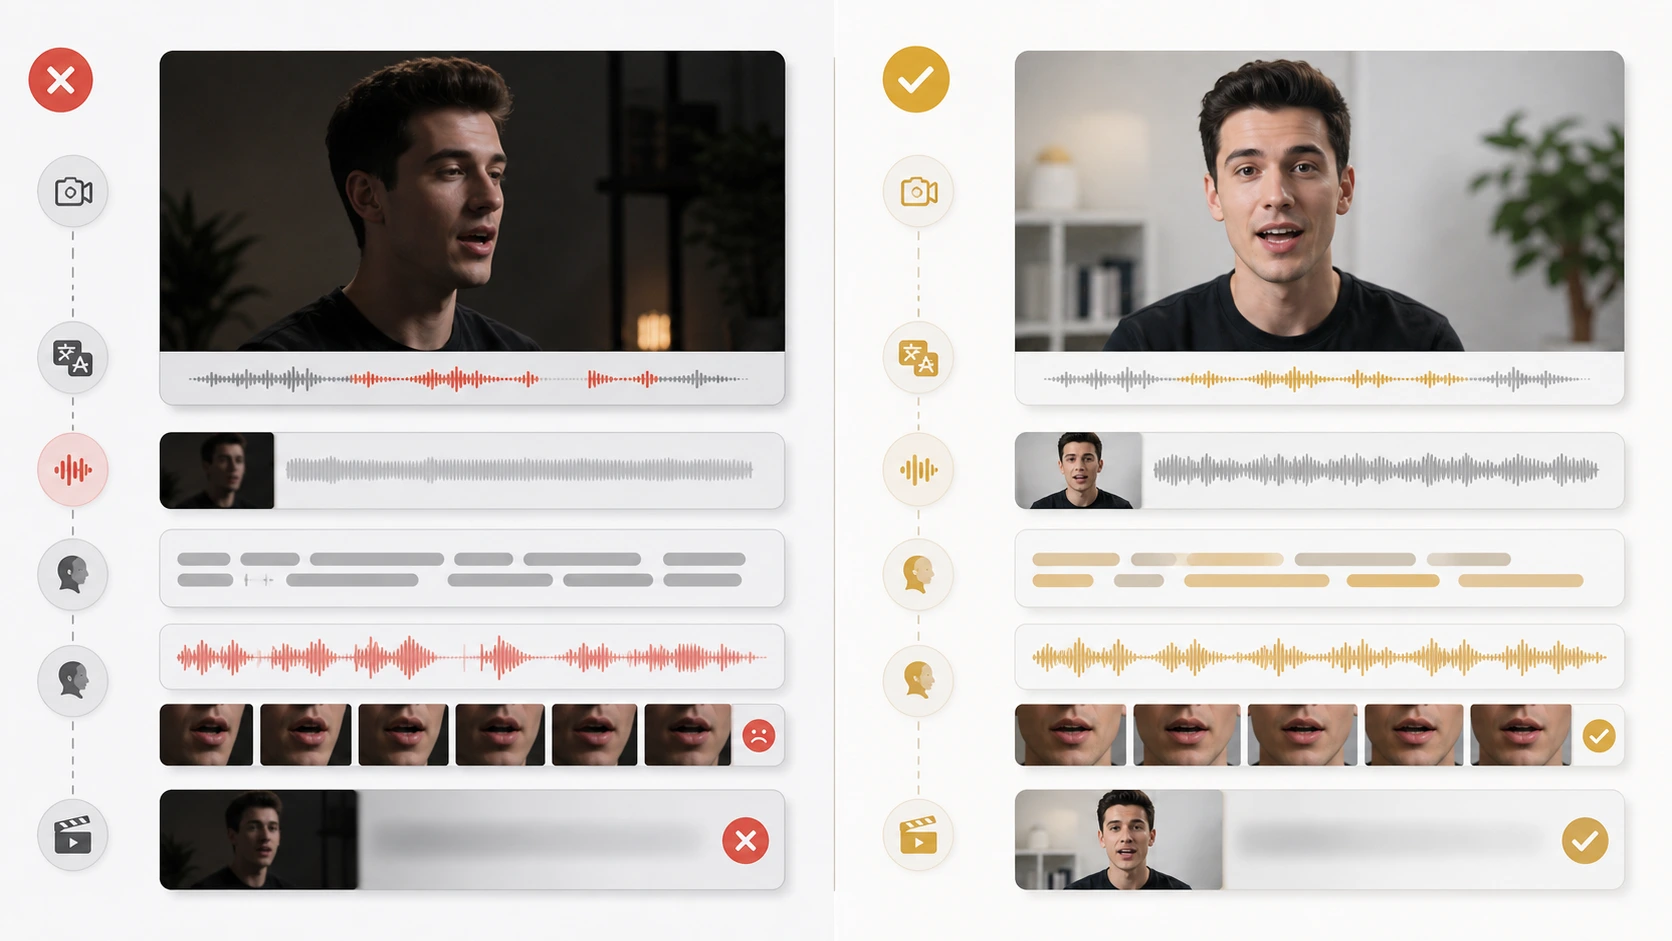
- The strongest AI lip sync videos start with footage that already gives the model a fair chance.
- Translation quality matters as much as mouth movement because timing and phrasing change from language to language.
- Official workflows from YouTube, Descript, and HeyGen all point to the same pattern: edit first, localize second, sync last.
- A fast preview is useful, but the real test is whether you can review, revise, and publish without getting trapped in a bad queue.
- If your team needs repeatable output, treat AI lip sync as part of a workflow, not as a standalone effect.
Start with footage that can survive lip sync
The source clip decides more than most creators expect. Clean lip sync works best when the speaker faces the camera, the mouth stays visible, and the lighting does not shift wildly between frames.
That sounds simple, but it explains why one AI render looks excellent and another falls apart. A close talking-head shot with stable framing gives the model clear mouth shapes to work from. A dark side angle, rapid cuts, or hands covering the face gives it far less usable information.
This is also why a lot of “AI lip sync failed” complaints are really input problems:
- the speaker is too small in frame
- the camera angle changes too often
- the mouth is partly blocked
- the translation runs much longer than the original delivery
If your footage is weak at the source level, no workflow choice later will fully rescue it.
Write or adapt the translation for spoken timing
One of the most useful official cues comes from Descript's translate and dub overview. It frames translation as a finishing step after the edit is settled, not as something you improvise while still changing the cut.
That matters because literal translation is rarely the best lip sync script.
When you create AI lip sync videos, the translated line should preserve meaning and spoken rhythm. A translated sentence that is technically correct but 30% longer than the original often creates the exact mismatch viewers notice first.
Use this simple rewrite test before you sync anything:
| Check | Weak version | Stronger version |
|---|---|---|
| Sentence length | Longer than the original | Similar speaking time |
| Phrasing | Literal and stiff | Natural spoken wording |
| Pause structure | One long clause | Clear pauses for breathing |
| Review goal | “Correct translation” | “Believable spoken delivery” |
This is the part most teams skip because it feels slower up front. In practice, it saves rerenders.
Choose the right lip sync path for the job
Not every multilingual workflow needs the same output.
YouTube's official multi-language audio tracks help page and its May 15, 2026 update on auto dubbing and Expressive Speech make one thing clear: more creators can now publish multiple spoken versions of one video without maintaining separate channel uploads.
That means your first decision is no longer “Should I localize at all?” It is “What type of localization does this video justify?”
Use this split:
- Subtitles only when the speaker is not visually central
- Dubbed audio when the audio matters more than the face
- Full lip sync when the face stays on screen long enough for mismatch to feel distracting
HeyGen's video translation overview is helpful here because it separates Audio Dubbing from Video Dubbing. That is a useful mental model even if you never use HeyGen directly. Audio-only localization and lip-synced video are different deliverables.
If you get this decision wrong, the workflow becomes inefficient fast. Teams often pay for lip sync when captions would have been enough, or they ship dubbed audio alone when the visible face clearly needs synchronization.
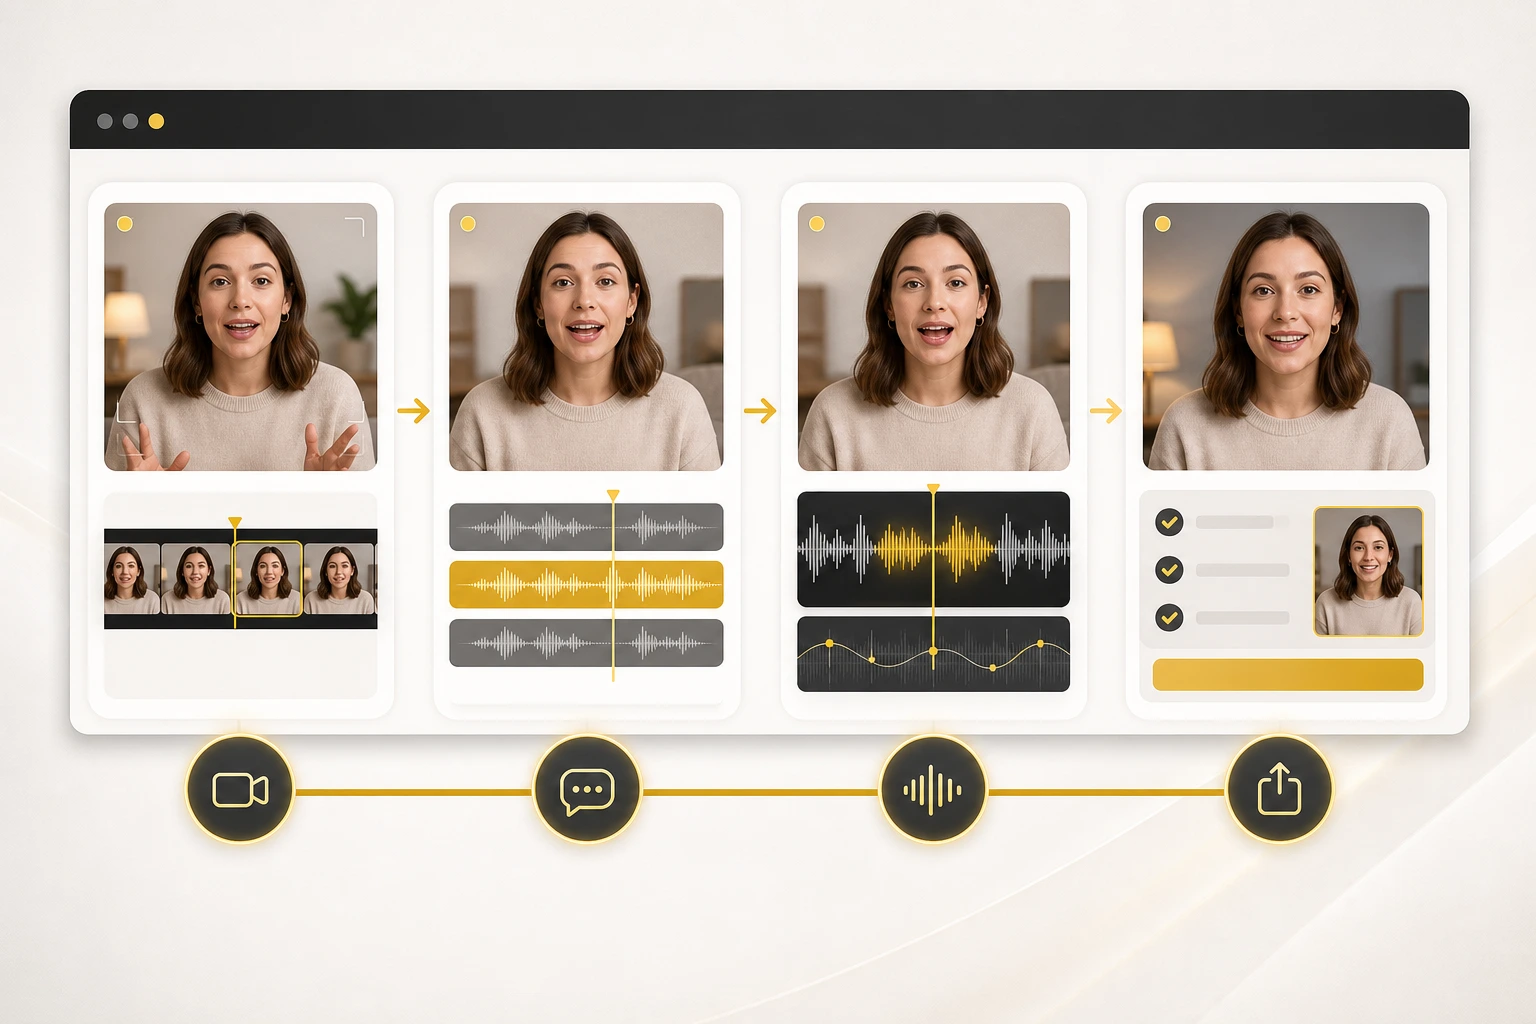
Build the sync pass around review, not magic
The fastest way to create bad AI lip sync videos is to assume the first render is the final render.
Strong workflows do the opposite. They plan for one preview, one editorial review, and one corrected pass before publish.
Inside LipSyncX Studio, that usually means testing a short preview first, checking whether the credit cost matches the value of the clip, and only then committing the longer job. That matters because a messy queue and an unclear retry path can erase any time you thought the tool saved.
This is the review checklist worth using every time:
- Watch the mouth on stressed syllables and sentence endings.
- Check whether the translated pacing feels rushed or too slow.
- Listen for pronunciation that makes the face feel late or early.
- Confirm that facial expression still matches the intent of the line.
- Decide whether the video needs a rerender or a script rewrite.
If the problem is only timing, rerendering may be enough. If the problem is awkward phrasing, change the script first. That distinction saves time.
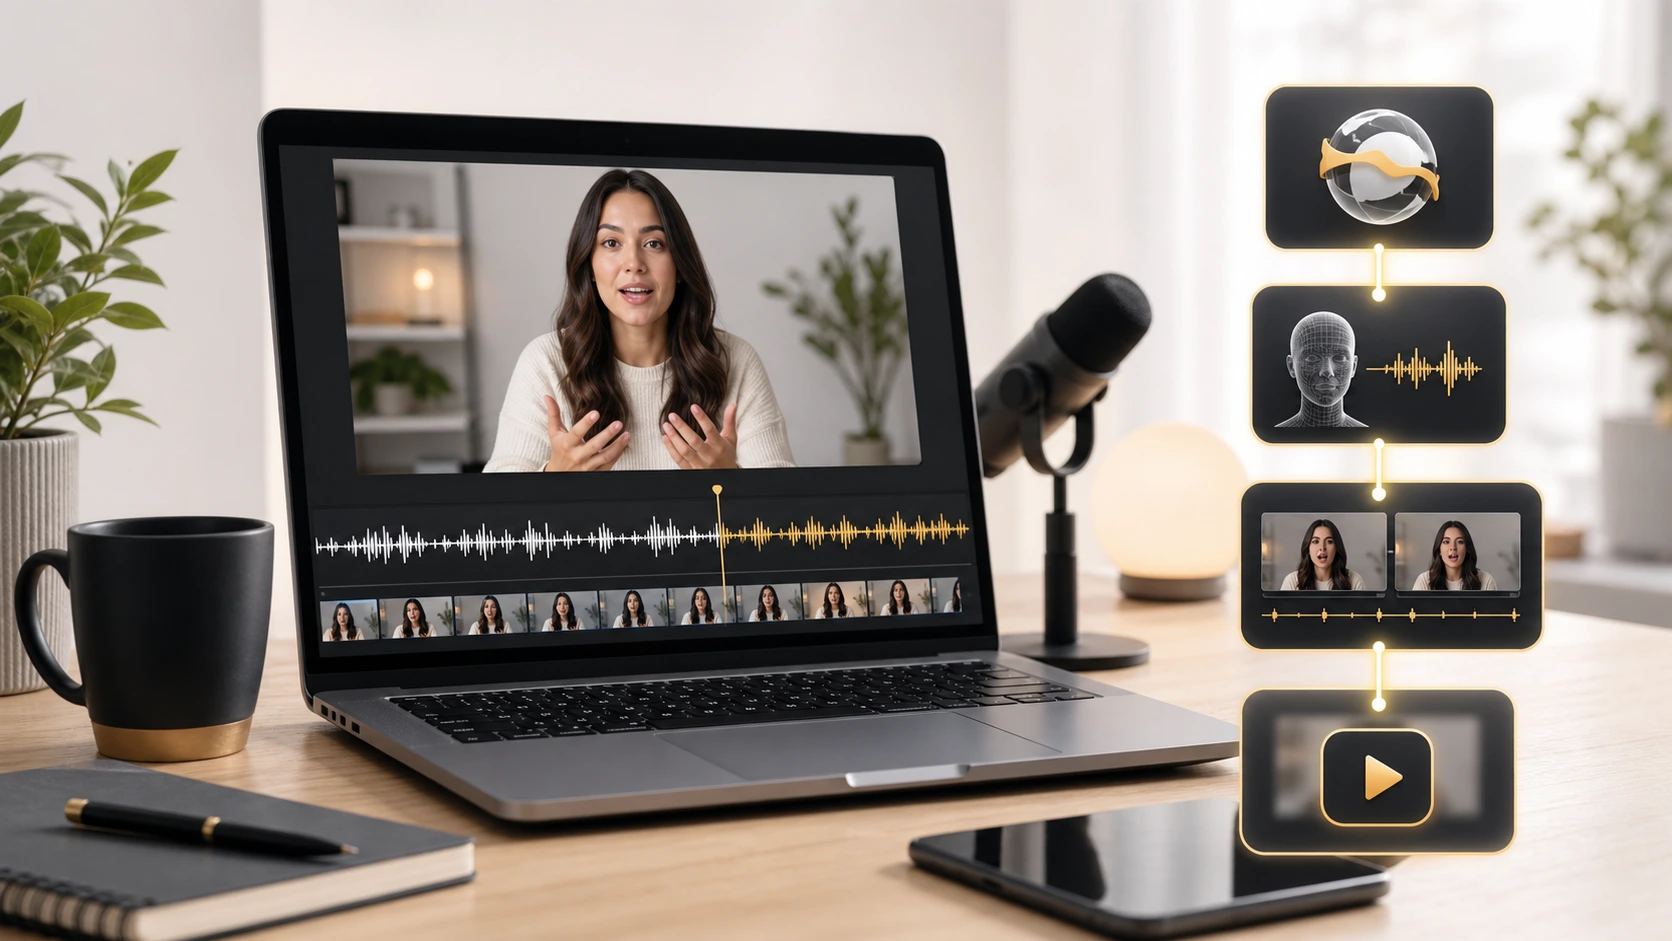
Use one workflow for preview, production, and publishing
The reason many AI lip sync projects feel fragile is not the model. It is the handoff between tools.
Teams often write the script in one place, generate audio in another, sync in a third, then manually keep track of exports in a folder full of unclear file names. That is when version mistakes start to compound.
The better path is to keep one reviewable workflow from first pass to final output:
- keep the approved source clip fixed
- keep the translated script versioned
- preview one short pass before the full render
- use one publish-ready export path
That is where AI video dubbing workflows become more useful than isolated experiments. The win is not only the sync quality. It is the ability to move from test to publish without rebuilding the same context every time.
If you are budgeting for repeated use, check the pricing page before you scale the workflow. It is better to know how credits, review passes, and expected volume interact before your team depends on the process.
Common mistakes that make AI lip sync look fake
Mistake 1: syncing before the translation is approved
If the script still changes, the lip sync pass is too early. You end up paying for fixes that should have been handled in text.
Mistake 2: using footage with avoidable visual problems
Extreme profile angles, mouth obstruction, low light, and rapid jump cuts all reduce the chance of a believable result.
Mistake 3: treating speed as the only success metric
Fast output is useful, but a fast render nobody approves is still wasted time.
Mistake 4: confusing audio quality with lip sync quality
Clean dubbed speech can still look wrong on screen. Good lip sync solves a visible alignment problem, not only an audio replacement problem.
A practical 30-minute workflow you can repeat
If you need a repeatable baseline, use this order:
- Pick one talking-head clip with clear face visibility.
- Lock the edit before translation work begins.
- Rewrite the translated script for spoken timing.
- Run one short preview and review the mouth on key phrases.
- Adjust the script or rerender once, then export the publishable version.
That workflow is boring on purpose. Boring workflows scale.
It also matches the broader platform direction. YouTube keeps making multilingual distribution easier, but easier distribution increases the cost of sloppy localization. Once viewers can switch audio tracks inside one video, the quality of the localized version matters more, not less.
Where LipSyncX fits in the workflow
If you already know the speaker's face matters, LipSyncX is most useful as the bridge between translated intent and publishable output.
The product question is practical, not philosophical:
- can you preview quickly
- can you understand the credit cost
- can you review without losing version control
- can you publish without rebuilding the same clip in three tools
That is why the cleanest test is not a long debate about AI. It is one real clip inside LipSyncX Studio, followed by a comparison against your current AI video dubbing workflow. If the team reaches approval faster with fewer handoff mistakes, the workflow is doing its job.
FAQ
Do I need perfect source footage to create AI lip sync videos?
No, but you do need usable footage. Front-facing shots with a visible mouth and steady framing perform much better than dark, angled, or heavily obstructed clips.
Should I translate first or lip sync first?
Translate first. Approve the spoken script, then run lip sync on the stabilized wording.
Are dubbed audio and lip sync the same thing?
No. Dubbed audio replaces the speech. Lip sync aligns the visible mouth movement to that speech.
What is the fastest way to test whether AI lip sync will work for my content?
Use one short speaker-led clip, preview it once, and review the result on stressed syllables, pauses, and facial expression before scaling up.
The part that decides whether this scales
Creating AI lip sync videos is not hard because the button is hard to find. It is hard because weak inputs, weak scripts, and weak review habits all look similar in the final output.
If you fix those three layers in order, the process becomes much more predictable. If you skip them, even strong tools will look inconsistent. That is the practical difference between a clever demo and a workflow your team can actually ship with.